Description
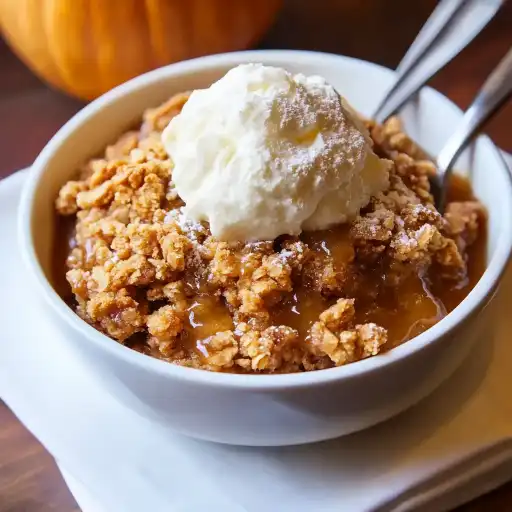
Indulge in the heartwarming embrace of fall with this easy-to-make Pumpkin Crisp. It’s a delightful dessert that combines the creamy richness of pumpkin filling with a buttery, oat-filled crisp topping. Perfect for Thanksgiving, cozy gatherings, or simply satisfying your autumn cravings.
Ingredients:
Filling:
- 15 oz (425g) pumpkin puree (not pumpkin pie filling)
- 3 large eggs
- 6 oz (177ml) evaporated milk
- ½ cup (100g) granulated sugar
- ½ cup (100g) light brown sugar, packed
- 1 teaspoon vanilla extract
- 1 teaspoon pumpkin pie spice
- 1 teaspoon salt
Topping:
- ¾ cup (90g) all-purpose flour
- ¾ cup (70g) old-fashioned rolled oats
- 1 cup (200g) light brown sugar, packed
- ½ cup (113g) salted butter, melted
- 1 teaspoon ground cinnamon
Preparation:
Step 1: Prepare the Topping: In a medium mixing bowl, combine the all-purpose flour, old-fashioned oats, light brown sugar, melted salted butter, and ground cinnamon.
Step 2: Use a fork or your fingers to mix the ingredients together until the mixture resembles coarse crumbs. The butter should be evenly distributed throughout the dry ingredients.
Step 3: Cover the bowl with plastic wrap and place it in the refrigerator to chill while you prepare the pumpkin filling. Chilling the topping helps the butter solidify, which results in a crispier topping after baking.
Step 4: Mix the Filling: In a large mixing bowl, combine the pumpkin puree, eggs, evaporated milk, granulated sugar, light brown sugar, vanilla extract, pumpkin pie spice, and salt.
Step 5: Use a whisk or an electric mixer to blend the ingredients together until the mixture is smooth and well combined. Be sure to scrape down the sides of the bowl to ensure all ingredients are fully incorporated.
Step 6: Assemble: Preheat your oven to 375°F (190°C). Grease an 8×11-inch baking pan with butter or cooking spray to prevent the crisp from sticking.
Step 7: Pour the pumpkin filling evenly into the prepared baking pan.
Step 8: Top it off: Remove the chilled topping from the refrigerator. Sprinkle the topping evenly over the pumpkin filling, making sure to cover the entire surface.
Step 9: Bake: Place the baking pan in the preheated oven and bake for 45-50 minutes, or until the topping is golden brown and the filling is set.
Step 10: To check if the filling is set, insert a knife or toothpick into the center of the crisp. If it comes out clean, the crisp is ready. If not, continue baking for a few more minutes until the filling is set.
Step 11: Cool & Serve: Remove the baked pumpkin crisp from the oven and place it on a wire rack to cool slightly before serving.
Step 12: Cooling the crisp allows the filling to set properly, making it easier to slice and serve.
Step 13: Serve warm with a scoop of vanilla ice cream or a dollop of whipped cream, if desired.
Why You’ll Love This Recipe
- Easy to Make: This recipe is straightforward and doesn’t require any special skills.
- Perfect for Fall: The warm spices and pumpkin flavor create a comforting and seasonal dessert.
- Great for Sharing: Ideal for potlucks, holiday gatherings, or family dinners.
- Versatile: Easily customizable with different toppings or spices to suit your taste.
- Delicious Texture: The combination of creamy filling and crispy topping is simply irresistible.
Serving Suggestions:
- Serve warm with a scoop of vanilla ice cream or whipped cream.
- Drizzle with caramel sauce or maple syrup.
- Dust with powdered sugar for an elegant touch.
- Pair with a warm beverage like coffee, tea, or hot chocolate.
Tips:
- Use pumpkin puree, not pumpkin pie filling, for the best flavor and texture.
- Chill the topping before baking to help it crisp up nicely.
- Don’t overbake the crisp, or the filling may become dry.
- If the topping starts to brown too quickly, cover the baking dish with foil for the last 15 minutes of baking.
- For a gluten-free option, use gluten-free all-purpose flour.
- Store leftovers in the refrigerator for up to 3 days.
Preparation Time: 20 minutes
Cook Time: 45-50 minutes
Total Time: 1 hour 10 minutes
Nutritional Information: (per serving, approximate)
Calories: 350
Protein: 5g
Sodium: 250mg
Conclusion
This Pumpkin Crisp recipe is a surefire way to impress your family and friends with a delicious and comforting dessert. The combination of warm spices, creamy pumpkin filling, and crispy oat topping is a match made in heaven. Whether you’re celebrating Thanksgiving or simply craving a taste of fall, this recipe is a must-try. Enjoy!
Questions and Answers:
Q1: Can I use pumpkin pie filling instead of pumpkin puree?
A: While you can, it’s recommended to use pumpkin puree for the best results. Pumpkin pie filling already contains added sugar and spices, which may make the crisp too sweet. If you do use pumpkin pie filling, reduce the amount of granulated sugar and pumpkin pie spice in the recipe.
Q2: Can I make this crisp ahead of time?
A: Yes, you can prepare the crisp ahead of time and bake it later. Assemble the crisp as instructed, then cover it tightly with plastic wrap and store it in the refrigerator for up to 24 hours. When ready to bake, remove it from the refrigerator and bake as directed.
Q3: Can I freeze the pumpkin crisp?
A: Yes, you can freeze the baked pumpkin crisp. Allow it to cool completely, then wrap it tightly with plastic wrap and aluminum foil. Freeze for up to 2 months. Thaw in the refrigerator overnight before reheating.
Q4: Can I add nuts to the topping?
A: Absolutely! Adding chopped nuts like pecans or walnuts to the topping will add extra flavor and crunch. Simply mix them in with the other topping ingredients before sprinkling over the pumpkin filling.
Q5: How do I reheat leftover pumpkin crisp?
A: You can reheat leftover pumpkin crisp in the oven or microwave. To reheat in the oven, preheat the oven to 350°F (175°C) and bake for 10-15 minutes, or until heated through. To reheat in the microwave, microwave on high for 30-60 seconds, or until heated through.
