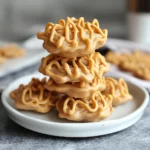
Description
These Cream Cheese Cookies are a delightful treat that combines the tangy richness of cream cheese with the sweet simplicity of a classic sugar cookie. The result is a soft, melt-in-your-mouth cookie that’s perfect for holidays, special occasions, or simply satisfying your sweet tooth. Easy to customize with food coloring and sprinkles, these cookies are as fun to make as they are to eat. The light and airy texture, achieved through the unique blend of butter and cream cheese, sets them apart from ordinary cookies, making them a memorable addition to any baking repertoire. Whether you’re an experienced baker or just starting out, this recipe is straightforward and yields consistently delicious results.
Ingredients:
For the Cookies:
- 1/2 lb (2 sticks or 226g) unsalted butter, softened
- 4 oz (113g) cream cheese, softened
- 1/2 cup (100g) granulated sugar
- 2 cups (240g) all-purpose flour
- 1 teaspoon vanilla extract
- Food coloring (optional)
For the Frosting:
- 3 tablespoons (42g) unsalted butter, softened
- 1 1/2 cups (180g) powdered sugar
- 1 to 2 tablespoons milk
- Food coloring (optional)
- Sprinkles (optional)
Preparation:
Step 1: Cream Butter and Cream Cheese: In a large mixing bowl, add the softened butter and cream cheese. Use a mixer with the whisk attachment to whip until the mixture is smooth and fluffy. This step is crucial for achieving the right texture, so ensure both ingredients are fully softened.
Step 2: Add Sugar and Vanilla: Add the granulated sugar and vanilla extract to the bowl. Mix again until the mixture is creamy and well combined. Scrape down the sides of the bowl to ensure all ingredients are evenly incorporated.
Step 3: Incorporate Flour: Slowly add the all-purpose flour to the mixture. Mix on low speed until a dough forms. Be careful not to overmix, as this can result in tough cookies. If you want to add food coloring for colored dough, do so now. Mix until the color is evenly distributed.
Step 4: Chill the Dough: Wrap the dough in plastic wrap and chill it in the refrigerator for at least 10 minutes. Chilling helps the dough firm up, making it easier to work with and preventing the cookies from spreading too much during baking.
Step 5: Preheat Oven and Prepare Baking Sheet: Preheat your oven to 400°F (200°C). Ensure your baking sheet is completely cool before proceeding. An ungreased baking sheet is recommended to prevent the cookies from spreading.
Step 6: Press Cookies: Fill a cookie press with the chilled dough. Press cookies onto the cool, ungreased baking sheet. Maintain consistent pressure to create uniform shapes. Ensure there’s enough space between each cookie to allow for even baking.
Step 7: Bake Cookies: Bake for 4 to 6 minutes, or until the bottoms of the cookies are lightly golden. Keep a close eye on them, as they can burn quickly. The baking time may vary depending on your oven, so check for doneness frequently.
Step 8: Cool Cookies: Once baked, transfer the cookies to a wire rack to cool completely. Cooling them on a rack prevents them from becoming soggy and allows them to retain their crisp shape.
Step 9: Make the Frosting: While the cookies are cooling, prepare the frosting. In a medium bowl, mix the softened butter, powdered sugar, and 1 tablespoon of milk until smooth. Add more milk, one teaspoon at a time, until you reach your desired consistency. Add food coloring if desired.
Step 10: Frost and Decorate: Once the cookies are completely cooled, frost them with the prepared frosting. Add sprinkles or other decorations as desired.
Why You’ll Love This Recipe
- Unique Texture: The addition of cream cheese creates a soft, almost melt-in-your-mouth texture that is truly irresistible.
- Easy to Customize: These cookies are a blank canvas! Easily add food coloring to the dough or frosting and decorate with your favorite sprinkles.
- Simple Ingredients: Uses common baking ingredients that you likely already have in your pantry.
- Quick to Bake: With a short baking time, you can have a batch of these cookies ready in no time.
- Perfect for Any Occasion: Whether it’s a holiday gathering, a birthday party, or just a sweet treat for yourself, these cookies are always a hit.
Serving Suggestions:
- Serve with a cold glass of milk or a cup of hot cocoa.
- Arrange on a festive platter for parties and gatherings.
- Package in decorative boxes as a thoughtful homemade gift.
- Enjoy as a sweet ending to any meal.
Tips:
- Ensure butter and cream cheese are fully softened for a smooth dough.
- If the dough is too soft, chill it longer.
- Use a cool baking sheet for clean cookie shapes.
- Watch the cookies closely to prevent overbrowning.
- For best results, use high-quality vanilla extract.
- Store frosted cookies in an airtight container to maintain freshness.
Preparation Time: 20 minutes Cook Time: 6 minutes Total Time: 26 minutes
Nutritional Information: (approximations, will vary based on specific ingredients and serving size) Calories: 120 per cookie Protein: 1g Sodium: 30mg
Conclusion:
Cream Cheese Cookies are a delightful treat that offers a unique twist on the classic sugar cookie. Their soft, creamy texture and customizable nature make them a versatile and enjoyable addition to any baker’s collection. Perfect for any occasion, these cookies are sure to bring a smile to anyone who tries them. With easy-to-follow instructions and simple ingredients, this recipe is a must-try for both novice and experienced bakers alike. Enjoy the delightful experience of baking and sharing these scrumptious Cream Cheese Cookies!
Questions and Answers:
- Can I use salted butter instead of unsalted butter?
- While unsalted butter is recommended for better control over the salt content, you can use salted butter. Just reduce the amount of salt in the recipe slightly to compensate.
- What can I do if my dough is too sticky to work with?
- If your dough is too sticky, add a tablespoon of flour at a time until it reaches a workable consistency. Also, ensure that you chill the dough for the recommended time, as chilling helps to firm it up.
- Can I freeze these cookies?
- Yes, you can freeze the unfrosted cookies for up to two months. Store them in an airtight container to prevent freezer burn. When ready to serve, thaw them completely and then frost as desired.
- What is the best way to store these cookies?
- Store the frosted cookies in an airtight container at room temperature to maintain their freshness. They will stay good for up to five days.
- Can I make these cookies without a cookie press?
- Yes, you can roll out the dough and use cookie cutters to create different shapes. Just ensure the dough is well-chilled before rolling it out. Alternatively, you can drop rounded teaspoons of dough onto the baking sheet for a more rustic look.