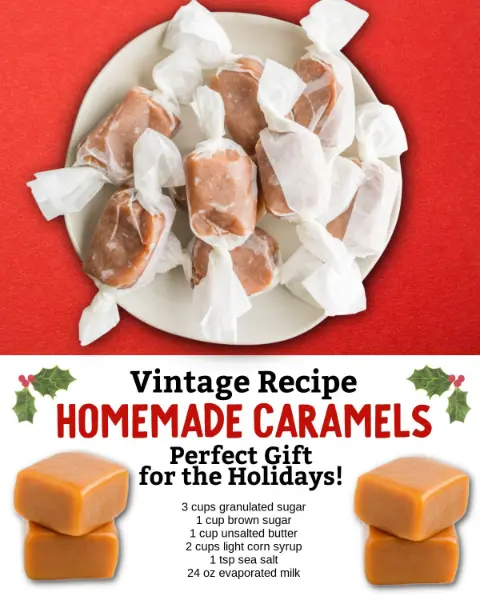
Description
These homemade caramels are a classic treat, offering a rich, buttery, and sweet flavor that’s hard to resist. This recipe delivers a soft, chewy texture that melts in your mouth, making them perfect for gifting, snacking, or simply indulging in a sweet craving. They are surprisingly easy to make, requiring just a few simple ingredients and a little patience. The key to success is careful monitoring of the temperature, so make sure you have a reliable candy thermometer on hand.
Ingredients:
- 3 cups granulated sugar
- 1 cup brown sugar
- 1 cup unsalted butter, softened
- 2 cups light corn syrup
- 1 teaspoon sea salt
- 24 ounces evaporated milk
Preparation:
Step 1: Prepare the Pan: Line a 9×13 inch baking pan with parchment paper. Ensure the parchment paper extends over the edges of the pan for easy removal of the caramels later.
Step 2: Combine Initial Ingredients: In a heavy-bottomed saucepan, combine the granulated sugar, brown sugar, softened butter, light corn syrup, and sea salt.
Step 3: Bring to a Boil: Place the saucepan over medium heat and bring the mixture to a boil, stirring constantly to prevent burning.
Step 4: Add Evaporated Milk: Very slowly pour in the evaporated milk, whisking or stirring constantly while boiling. Ensure the addition of the milk doesn’t slow down the boiling process. This slow addition and constant stirring is crucial to avoid lumps and ensure a smooth caramel texture. This step should take approximately 20 minutes.
Step 5: Cook to Temperature: Lower the heat to medium-low and attach a candy thermometer to the side of the saucepan. Continue cooking, stirring frequently, until the mixture reaches 238°F (114°C). This is the “soft-ball” stage.
Step 6: Pour and Cool: Once the mixture reaches 238°F, immediately remove the saucepan from the heat and carefully pour the hot caramel into the prepared pan.
Step 7: Allow to Cool: Let the caramels cool completely on the counter for about 4 to 5 hours, or until they are firm enough to cut.
Step 8: Cut and Wrap: Wet a sharp knife with cold water to prevent sticking, and slice the caramels into your desired size and shape. A common size is approximately 1-inch squares, which would yield about 80 caramels.
Step 9: Wrap Individually: Wrap each caramel with wax paper squares or pre-cut candy wrappers to prevent them from sticking together and to keep them fresh.
Why you’ll love this recipe
- Classic Flavor: These caramels deliver that nostalgic, comforting caramel taste we all love.
- Soft and Chewy Texture: The perfect balance of ingredients and cooking time results in a melt-in-your-mouth texture.
- Homemade Goodness: Nothing beats the taste of homemade candy, especially when it’s made with love and care.
- Perfect for Gifting: Individually wrapped caramels make a thoughtful and delicious gift for friends, family, and coworkers.
Serving Suggestions:
- Enjoy them as a sweet treat on their own.
- Add them to hot chocolate or coffee for a caramel-flavored boost.
- Chop them up and sprinkle them on top of ice cream or desserts.
- Include them in a candy buffet or dessert platter.
Tips:
- Use a Heavy-Bottomed Pan: This helps to distribute heat evenly and prevent scorching.
- Monitor the Temperature: A candy thermometer is essential for achieving the correct caramel consistency.
- Stir Constantly: This prevents the sugar from burning and ensures a smooth, creamy texture.
- Cool Completely: Allowing the caramels to cool completely before cutting is crucial for achieving the right firmness.
- Cut with a Warm Knife: Dipping the knife in warm water before each cut will help prevent the caramels from sticking.
- Wrap Tightly: Wrapping the caramels individually will keep them fresh and prevent them from sticking together.
Preparation Time: 15 minutes
Cook Time: 30-40 minutes
Total Time: 4-5 hours (includes cooling time)
Nutrition Information: (Approximate, per caramel square, varies based on size)
Calories: 75-100
Protein: Less than 1g
Sodium: 20-30mg
Conclusion
This caramel recipe is a delightful way to create a classic confection in your own kitchen. The combination of simple ingredients and careful execution results in a treat that is both satisfying and impressive. Whether you’re making them for yourself or to share with others, these homemade caramels are sure to be a hit. The process may require a bit of patience, especially during the cooking and cooling phases, but the end result is well worth the effort. Enjoy the sweet satisfaction of creating these buttery, chewy, and utterly delicious caramels!
Questions and Answers About This Recipe:
Q1: Can I use a different type of milk other than evaporated milk?
A1: While evaporated milk is recommended for its concentrated flavor and fat content, you can try using heavy cream as a substitute. However, the texture and flavor of the caramels may be slightly different. Avoid using regular milk, as it contains too much water and may prevent the caramels from setting properly.
Q2: What happens if I don’t have a candy thermometer?
A2: A candy thermometer is crucial for achieving the correct consistency of the caramels. Without it, it’s very difficult to gauge the temperature accurately. If you don’t have one, you can try using the “soft-ball stage” test by dropping a small amount of the caramel mixture into a bowl of cold water. If it forms a soft, pliable ball, it’s ready. However, this method is less precise and may not yield the best results.
Q3: How should I store the caramels?
A3: Store the individually wrapped caramels in an airtight container at room temperature. They should stay fresh for about 2-3 weeks. Avoid storing them in the refrigerator, as this can cause them to become too hard.
Q4: Can I add other flavorings to the caramels?
A4: Yes, you can definitely add other flavorings to customize your caramels. Some popular options include vanilla extract (added at the end of cooking), sea salt flakes (sprinkled on top after pouring into the pan), or a pinch of cinnamon or nutmeg. You could also add chopped nuts, dried fruit, or chocolate chips after the caramels have cooled slightly.
Q5: My caramels are too hard. What did I do wrong?
A5: If your caramels are too hard, it’s likely that you cooked them to too high of a temperature. The ideal temperature for soft caramels is 238°F (114°C). Cooking them even a few degrees higher can result in a harder, more brittle texture. Be sure to use a reliable candy thermometer and monitor the temperature carefully to avoid overcooking.