Description
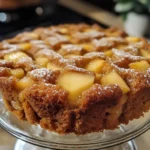
This blender banana cake recipe is the ultimate solution for using up overripe bananas. It’s incredibly easy, requiring no mixer or multiple bowls – just blend, bake, and enjoy! The result is a super moist, fluffy, and delicious cake that’s perfect for breakfast, dessert, or a snack any time of day. Feel free to customize it with chocolate chips or nuts for an extra touch of flavor and texture.
Ingredients:
- 3 ripe bananas 🍌
- 2 large eggs 🥚
- ½ cup sugar (white or brown)
- ¼ cup oil 🛢️
- ¼ cup milk 🥛
- 1 tsp vanilla extract
- 1½ cups all-purpose flour
- 1 tsp baking powder
- ½ tsp baking soda
- ¼ tsp salt 🧂
- (Optional: chocolate chips 🍫 or chopped nuts 🌰)
Preparation:
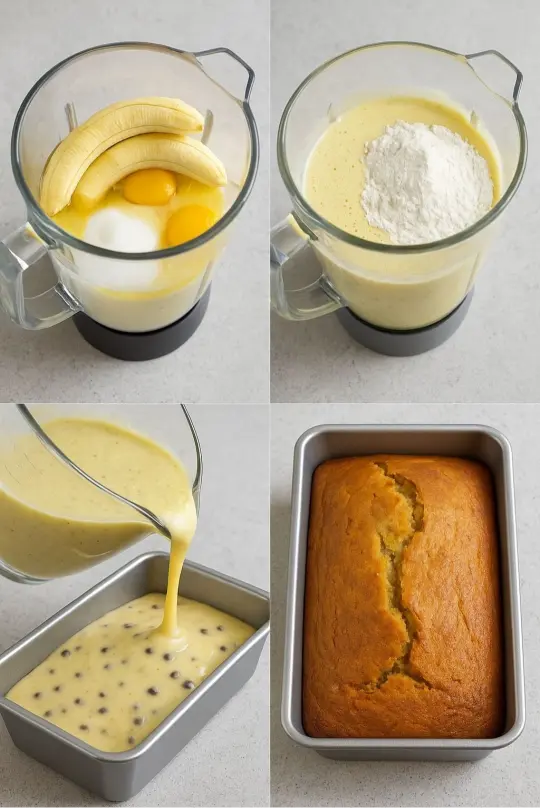
Step 1: Blend wet ingredients: Add bananas, eggs, sugar, oil, milk & vanilla to a blender. Blend until smooth.
Step 2: Add dry ingredients: Add flour, baking powder, baking soda & salt. Pulse just until combined (don’t overblend!).
Step 3: Add extras (optional) 😍: Stir in chocolate chips or nuts if using.
Step 4: Bake 🔥: Pour batter into a greased pan. Bake at 180°C / 350°F for 35–40 minutes (or until a toothpick comes out clean).
Step 5: Cool & enjoy 🤤: Let cool slightly, slice, and serve!
Why You’ll Love This Recipe
- Easy to Make: This recipe is incredibly simple and quick, perfect for beginner bakers or anyone short on time.
- Minimal Cleanup: Using a blender means fewer dishes to wash.
- Moist and Delicious: The bananas add natural sweetness and moisture, resulting in a soft and flavorful cake.
- Versatile: Easily customizable with your favorite add-ins like chocolate chips, nuts, or spices.
- Great for Using Overripe Bananas: A perfect way to prevent food waste and turn those browning bananas into a tasty treat.
Serving Suggestions:
- Serve warm with a dollop of whipped cream or a scoop of vanilla ice cream.
- Enjoy a slice with your morning coffee or tea.
- Spread with cream cheese frosting for a more decadent dessert.
- Toast slices and top with butter or your favorite jam.
Tips:
- Don’t Overblend: When adding the dry ingredients, pulse the blender just until everything is combined. Overblending can result in a tough cake.
- Use Ripe Bananas: The riper the bananas, the sweeter and more flavorful the cake will be.
- Grease the Pan Well: Make sure to grease your baking pan thoroughly to prevent the cake from sticking. You can also use parchment paper to line the bottom.
- Check for Doneness: Use a toothpick to check if the cake is done. Insert it into the center of the cake; if it comes out clean, the cake is ready.
Preparation Time:
10 minutes
Cook Time:
35-40 minutes
Total Time:
45-50 minutes
Nutrition Information:
(Note: Nutritional information is an estimate and may vary based on specific ingredients and serving size.)
- Calories: Approximately 250-300 per slice
- Protein: Approximately 4-5 grams per slice
- Sodium: Approximately 150-200mg per slice
Conclusion
This blender banana cake recipe is a game-changer for busy bakers. Its simplicity and delicious results make it a go-to recipe for using up those overripe bananas. Whether you enjoy it as a quick breakfast, a comforting snack, or a simple dessert, this cake is sure to satisfy your cravings. So, grab your blender and get ready to bake up a moist and flavorful treat!
Questions and Answers
Q1: Can I use a different type of flour?
A: While all-purpose flour works best, you can substitute with whole wheat flour for a slightly denser and nuttier cake. You may need to adjust the liquid slightly if using whole wheat flour.
Q2: Can I reduce the amount of sugar?
A: Yes, you can reduce the sugar to 1/3 cup if you prefer a less sweet cake. The bananas provide natural sweetness, so the cake will still be delicious.
Q3: Can I make this recipe gluten-free?
A: Yes, you can use a gluten-free all-purpose flour blend. Make sure to check that the blend contains xanthan gum or add it separately for better texture.
Q4: Can I freeze this banana cake?
A: Absolutely! Let the cake cool completely, then wrap it tightly in plastic wrap and aluminum foil. It can be stored in the freezer for up to 2-3 months. Thaw overnight in the refrigerator before serving.
Q5: What size pan should I use?
A: An 8×8 inch square pan or a 9×5 inch loaf pan works best for this recipe.