Description
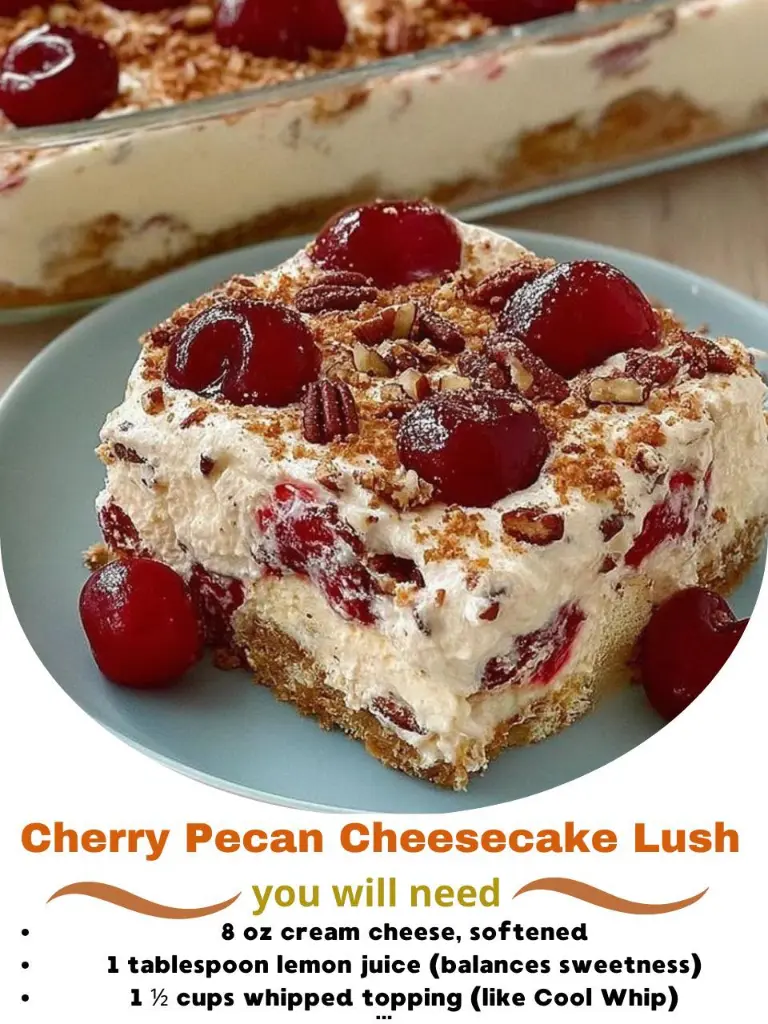
This Cherry Pecan Cheesecake Lush is a delightful layered dessert perfect for any occasion. It features a buttery pecan crust, a creamy cheesecake filling, a sweet cherry layer, and a fluffy whipped topping, all combining to create a symphony of flavors and textures. This no-bake dessert is easy to make and is sure to impress your friends and family.
Ingredients
For the Pecan Crust:
- 1 ½ cups crushed graham crackers or vanilla wafers
- ¾ cup finely chopped pecans (lightly toasted)
- ½ cup (1 stick) unsalted butter, melted
- 2 tablespoons granulated sugar
For the Cheesecake Layer:
- 8 oz cream cheese, softened
- ½ cup powdered sugar
- 1 teaspoon pure vanilla extract
- 1 tablespoon lemon juice
- 1 ½ cups whipped topping (like Cool Whip)
For the Cherry Layer:
- 1 can (21 oz) cherry pie filling
- Optional: ½ teaspoon almond extract
For the Topping Layer:
- 2 cups whipped topping (Cool Whip or homemade whipped cream)
- ¼ cup chopped toasted pecans
- 3–4 fresh cherries (for garnish, optional)
Preparation
Step 1: Prepare the Pecan Crust
- In a medium bowl, combine the crushed graham crackers, pecans, melted butter, and sugar.
- Stir until the mixture looks like wet sand.
- Press it firmly into the bottom of a 9×13-inch baking dish using the back of a spoon or a flat measuring cup.
- For a no-bake version, place the crust in the refrigerator for 20–30 minutes to firm up.
- For extra crispness, bake at 350°F (177°C) for 10 minutes, then cool completely.
Step 2: Make the Cheesecake Layer
- In a large mixing bowl, beat the cream cheese with an electric mixer until smooth and creamy (no lumps).
- Add the powdered sugar, vanilla extract, and lemon juice. Mix until light and fluffy.
- Gently fold in 1 ½ cups whipped topping until well incorporated and smooth.
- Spread the cheesecake mixture evenly over the chilled crust using a spatula.
Step 3: Add the Cherry Layer
- Carefully spoon the cherry pie filling over the cheesecake layer.
- Spread evenly using a spatula, making sure not to mix the layers.
- If you like a stronger cherry flavor, stir in a touch of almond extract before spreading.
Step 4: Add the Final Whipped Topping Layer
- Spread the remaining 2 cups of whipped topping evenly over the cherry layer.
- Use an offset spatula to smooth the top for a clean, elegant finish.
Step 5: Garnish and Chill
- Sprinkle the top with chopped toasted pecans for crunch and decoration.
- Optionally, add a few fresh cherries or a drizzle of cherry syrup for extra flair.
- Cover the dish with plastic wrap and refrigerate for at least 4 hours, or overnight for best results.
Why You’ll Love This Recipe
This recipe is a crowd-pleaser because it’s easy to make, requires no baking (unless you prefer a baked crust), and delivers a perfect balance of flavors and textures. The pecan crust adds a nutty crunch, the cheesecake layer is creamy and tangy, the cherry layer provides a sweet and fruity burst, and the whipped topping adds a light and airy finish.
Serving Suggestions
- Serve chilled as a refreshing dessert.
- Pair with a cup of coffee or tea.
- Great for potlucks, parties, or holiday gatherings.
Tips
- Toast the pecans before adding them to the crust to enhance their flavor.
- Use room-temperature cream cheese for a smooth, lump-free cheesecake filling.
- Chill the dessert for at least 4 hours, or overnight, to allow the layers to set properly.
- Substitute cherry pie filling with other fruit fillings like blueberry, strawberry, or mixed berry.
- For a richer flavor, use homemade whipped cream instead of store-bought whipped topping.
Preparation Time: 20 minutes Cook Time: 10 minutes (for baked crust option) Total Time: 4 hours (including chilling)
Nutritional Information (per serving, approximate)
- Calories: 450
- Protein: 5g
- Sodium: 200mg
Conclusion
The Cherry Pecan Cheesecake Lush is a fantastic dessert that is both easy to prepare and delightful to eat. With its layers of flavor and contrasting textures, it’s sure to become a favorite for any occasion. Enjoy this no-bake treat and impress your friends and family with your dessert-making skills!
Questions and Answers
- Can I make this dessert ahead of time?
- Yes, this dessert is perfect for making ahead of time. In fact, it’s best if it chills in the refrigerator for at least 4 hours, or overnight, to allow the layers to set and the flavors to meld together.
- Can I use a different type of nut for the crust?
- Absolutely! If you’re not a fan of pecans, you can substitute them with walnuts, almonds, or even macadamia nuts. Just make sure to chop them finely and toast them lightly before adding them to the crust mixture.
- Is it necessary to bake the crust?
- No, baking the crust is optional. If you prefer a firmer crust, you can bake it at 350°F (177°C) for 10 minutes and then let it cool completely before adding the other layers. If you prefer a no-bake version, simply press the crust into the baking dish and chill it in the refrigerator for 20–30 minutes.
- Can I use homemade whipped cream instead of store-bought whipped topping?
- Yes, homemade whipped cream will add a richer flavor and a more luxurious texture to the dessert. Just make sure to whip it to stiff peaks before spreading it over the cherry layer.
- Can I substitute the cherry pie filling with another type of fruit filling?
- Of course! This recipe is very versatile, and you can easily substitute the cherry pie filling with blueberry, strawberry, or mixed berry pie filling. You can also use fresh fruit compote for a healthier option.