Short Description
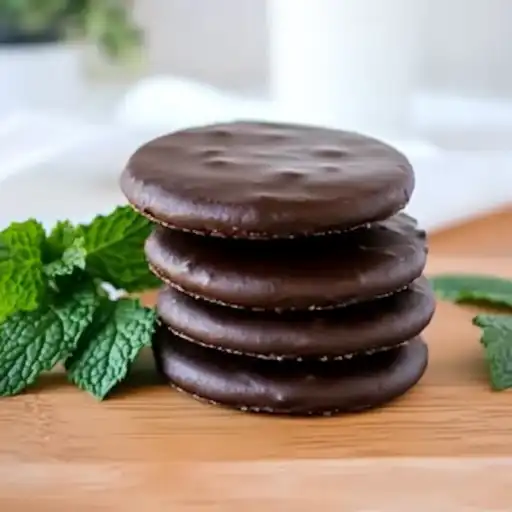
These homemade Thin Mint cookies capture the iconic flavor of the classic treat. Crisp, chocolatey cookies with a refreshing peppermint kick, coated in a rich, smooth chocolate shell. Perfect for satisfying your mint chocolate cravings!
Ingredients:
For the Cookies:
- 1/2 cup (1 stick) unsalted butter, softened
- 1/2 cup granulated sugar
- 1/2 cup packed light brown sugar
- 1 large egg
- 1 teaspoon pure peppermint extract
- 1 cup all-purpose flour
- 1/3 cup unsweetened cocoa powder
- 1/2 teaspoon baking powder
- 1/2 teaspoon salt
For the Chocolate Coating:
- 8 ounces semi-sweet chocolate, finely chopped
- 1/2 teaspoon vegetable oil (or coconut oil)
- 1/4 – 1/2 teaspoon pure peppermint extract (adjust to taste)
Preparation:
Step 1: Cream Butter and Sugar
In a large mixing bowl, cream together the softened butter, granulated sugar, and brown sugar until light and fluffy. This usually takes 2-3 minutes with an electric mixer.
Step 2: Add Egg and Peppermint
Beat in the egg and peppermint extract until well combined. Make sure to scrape down the sides of the bowl to ensure everything is mixed evenly.
Step 3: Combine Dry Ingredients
In a separate bowl, whisk together the flour, cocoa powder, baking powder, and salt. This ensures that the dry ingredients are evenly distributed throughout the dough.
Step 4: Gradually Add Dry Ingredients to Wet Ingredients
Gradually add the dry ingredients to the wet ingredients, mixing on low speed until just combined. Be careful not to overmix, as this can result in tough cookies. The dough should come together into a cohesive ball.
Step 5: Chill the Dough
Divide the dough in half, flatten each half into a disc, wrap tightly in plastic wrap, and chill in the refrigerator for at least 30 minutes. This chilling step is crucial as it prevents the cookies from spreading too much during baking.
Step 6: Roll Out the Dough
Preheat oven to 350°F (175°C). Line baking sheets with parchment paper. On a lightly floured surface, roll out one disc of dough to about 1/8-inch thickness. Work quickly, as the dough will soften as it warms up.
Step 7: Cut Out Cookies
Use a 1 1/2- to 2-inch round cookie cutter (or any desired shape) to cut out cookies. Place the cookies onto the prepared baking sheets, leaving a little space between them.
Step 8: Bake the Cookies
Bake for 8-10 minutes, or until the edges are set and the cookies are firm to the touch.
Step 9: Cool the Cookies
Let the cookies cool on the baking sheets for a few minutes before transferring them to a wire rack to cool completely.
Step 10: Prepare the Chocolate Coating
While the cookies are cooling, prepare the chocolate coating. In a heatproof bowl set over a saucepan of simmering water (double boiler), melt the chocolate and vegetable oil together, stirring occasionally until smooth. Be careful not to let any water get into the chocolate, as this can cause it to seize. Remove from heat and stir in the peppermint extract.
Step 11: Dip the Cookies
Dip each cookie into the melted chocolate, allowing any excess to drip off. Place the dipped cookies onto parchment paper-lined baking sheets.
Step 12: Chill the Coated Cookies
Refrigerate the cookies for at least 20-30 minutes, or until the chocolate is set.
Why You’ll Love This Recipe
- Classic Flavor: These cookies taste just like the real deal, with a perfect balance of chocolate and peppermint.
- Homemade Goodness: You control the ingredients, ensuring high-quality cookies without any preservatives.
- Customizable: Adjust the amount of peppermint extract to suit your taste preferences. You can also use different types of chocolate (dark, milk, or white) for the coating.
- Fun to Make: This recipe is a fun project to do with kids or friends.
- Perfect for Gifting: Homemade Thin Mints make a thoughtful and delicious gift.
Serving Suggestions:
- Enjoy with a cold glass of milk.
- Serve with coffee or hot chocolate.
- Add to a dessert platter for parties.
- Crumbled on top of ice cream.
- Pack them in a lunchbox for a special treat.
Tips:
- Chill the Dough: Don’t skip the chilling step! It’s essential for preventing the cookies from spreading and helps develop the flavor.
- Don’t Overbake: Overbaking will result in dry, crumbly cookies. Bake just until the edges are set.
- Use Good Quality Chocolate: The quality of the chocolate will significantly impact the taste of the coating. Choose a high-quality semi-sweet chocolate for the best results.
- Melt Chocolate Slowly: Be patient when melting the chocolate. Use low heat and stir frequently to prevent burning.
- Add Peppermint Extract Gradually: Start with a small amount of peppermint extract and add more to taste. Some extracts are stronger than others.
- Store Properly: Store the cookies in an airtight container in the refrigerator to keep the chocolate firm.
Preparation Time:
- Prep time: 45 minutes (includes chilling)
- Cook time: 8-10 minutes
- Total time: 1 hour (plus chilling time)
Nutrition Information:
(Estimates will vary based on specific ingredients and portion sizes)
- Calories: 150-200 per cookie
- Protein: 1-2g per cookie
- Sodium: 50-75mg per cookie
Conclusion
These Homemade Thin Mint Cookies are a delightful treat that will satisfy any mint chocolate craving. With a crisp, chocolatey cookie base and a smooth, peppermint-infused chocolate coating, they’re a perfect homemade version of the classic favorite. Enjoy the process of making them and savor every delicious bite!
Questions and Answers
Q1: Can I use a different type of flour?
A: While all-purpose flour is recommended for this recipe, you can substitute with gluten-free all-purpose flour blend. Keep in mind that the texture might slightly differ.
Q2: Can I make the dough ahead of time?
A: Yes, you can make the dough ahead of time and store it in the refrigerator for up to 2 days. Just make sure to wrap it tightly in plastic wrap to prevent it from drying out.
Q3: Can I freeze the cookies?
A: Yes, you can freeze the baked and coated cookies. Place them in an airtight container or freezer bag and freeze for up to 2 months. Let them thaw in the refrigerator before serving.
Q4: What can I use instead of vegetable oil in the chocolate coating?
A: You can use coconut oil or shortening as a substitute for vegetable oil in the chocolate coating. These will help to create a smooth and glossy finish.
Q5: My chocolate seized up when I was melting it. What can I do?
A: Seized chocolate can be frustrating, but sometimes you can save it. Try adding a teaspoon of hot water at a time, stirring vigorously until the chocolate becomes smooth again. Be careful not to add too much water, as this can make the chocolate grainy.