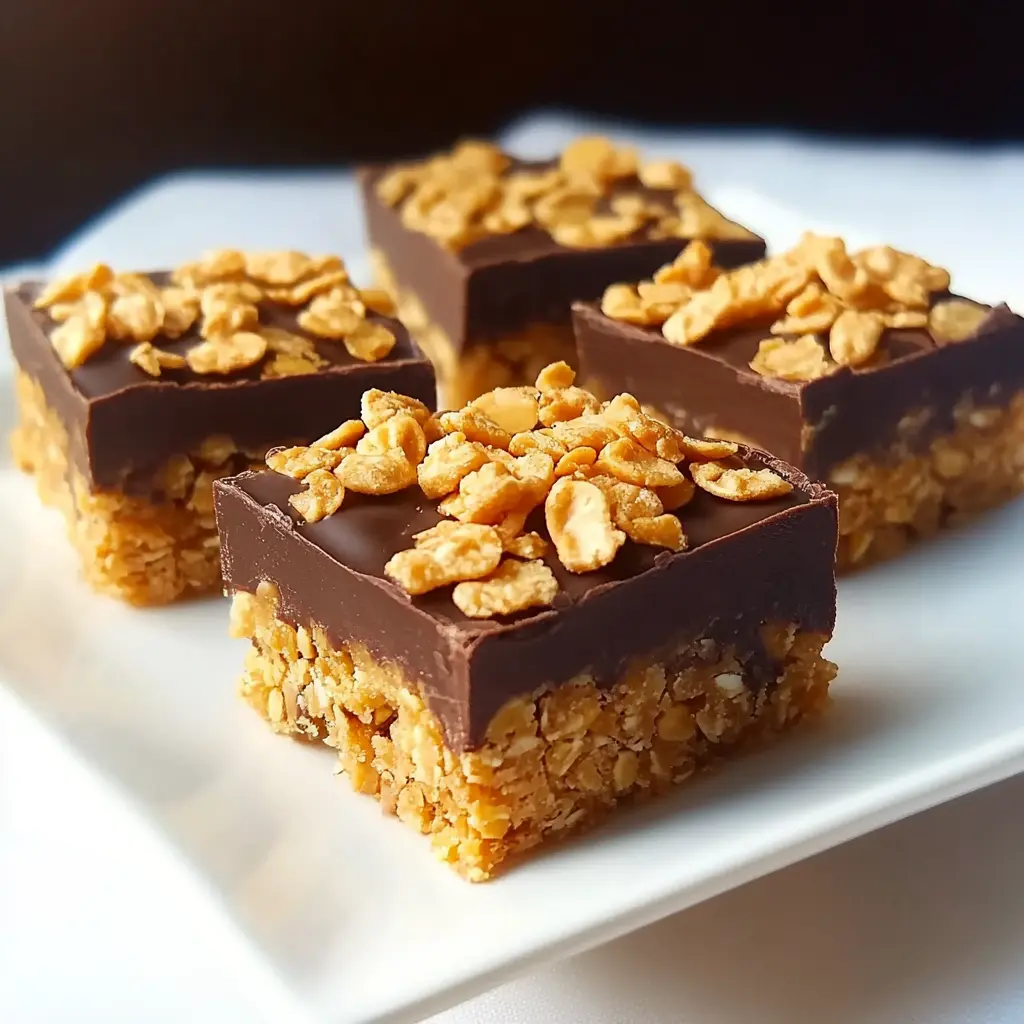
Description
These No-Bake Crispy Corn Flake Chocolate Peanut Butter Bars are a delightful treat that requires absolutely no baking! Combining the satisfying crunch of corn flakes with the creamy richness of peanut butter and the smooth allure of chocolate, these bars are incredibly easy to make and utterly irresistible. Perfect for a quick dessert, a fun family activity, or a sweet snack to satisfy your cravings!
Ingredients:
- 4 tablespoons (½ stick) unsalted butter
- 1 cup creamy peanut butter
- ½ cup light corn syrup
- ⅓ cup light brown sugar
- Pinch of salt
- 4 cups corn flakes, lightly crushed
- ⅓ cup salted peanuts, chopped (¼ cup + ⅛ cup divided)
- 1 teaspoon pure vanilla extract
- 4 ounces bittersweet chocolate, finely chopped
Preparation:
Step 1: Line the Pan: Begin by lining an 8×8-inch square baking dish with either foil or parchment paper. Make sure the lining extends slightly over the edges of the pan; this will act as handles, making it easier to lift the finished bars out later.
Step 2: Melt the Base Ingredients: In a medium saucepan, place the unsalted butter. Melt it over medium heat. Once melted, add the creamy peanut butter, light corn syrup, light brown sugar, and a pinch of salt to the saucepan.
Step 3: Combine Until Smooth: Stir the mixture continuously with a spatula or wooden spoon until all the ingredients are fully melted and thoroughly combined. The mixture should be smooth and homogenous, without any lumps. This usually takes about 3-5 minutes.
Step 4: Add Crunchy Ingredients: Remove the saucepan from the heat. Immediately add the crushed corn flakes and ¼ cup of the chopped salted peanuts into the saucepan. Pour in the vanilla extract.
Step 5: Mix Well: Stir all the ingredients together until the corn flakes and peanuts are evenly coated with the peanut butter mixture. Ensure the corn flakes are well distributed to give a consistent texture throughout the bars.
Step 6: Transfer to Pan: Pour the mixture into the prepared baking dish. Use the spatula or your fingers (lightly dampened to prevent sticking) to press the mixture down evenly. Spread it into a compact and uniform layer across the entire dish.
Step 7: Melt Chocolate: Melt the chopped bittersweet chocolate in a heatproof bowl set over a pan of simmering water (double boiler method) or in the microwave. If microwaving, heat in 20-second intervals, stirring in between, to prevent burning. Continue until the chocolate is completely melted and smooth.
Step 8: Spread Chocolate Evenly: Pour the melted chocolate over the pressed corn flake mixture in the baking dish. Use the spatula to spread the chocolate evenly, creating a smooth, consistent top layer.
Step 9: Add Final Touch: Immediately sprinkle the remaining ⅛ cup of chopped peanuts over the chocolate layer. This adds an extra crunch and enhances the visual appeal of the bars.
Step 10: Chill Until Set: Place the baking dish in the refrigerator. Chill for at least 2 hours, or preferably longer, until the bars are firm and completely set.
Step 11: Slice and Serve: Once the bars are fully set, remove the baking dish from the refrigerator. Lift the bars out using the foil or parchment paper overhang. Place the slab on a cutting board. To cut the bars into clean squares, run a large knife under hot water, wipe it dry with a towel, and then slice through the bars in one smooth, even motion. Repeat this process between each cut for the neatest results.
Why You’ll Love This Recipe
- No-Bake Simplicity: Perfect for hot days when you don’t want to turn on the oven.
- Quick and Easy: Ready in minutes with minimal cleanup.
- Kid-Friendly: A fun and safe recipe to make with children.
- Crowd-Pleasing: Everyone loves the combination of chocolate, peanut butter, and crunch.
- Customizable: Easy to adapt with your favorite mix-ins like pretzels or marshmallows.
Serving Suggestions:
- Serve these bars chilled straight from the refrigerator.
- Pair them with a cold glass of milk or a scoop of vanilla ice cream.
- Cut into small squares for an easy party snack or dessert.
- Wrap individually for a delightful homemade gift.
Tips:
- Prevent Softening: These bars tend to soften at room temperature, so keep them refrigerated for the best texture.
- Customizable Mix-Ins: Feel free to add pretzels, dried fruit, mini marshmallows, or other nuts for a personalized twist.
- Thinner Bars: If you prefer thinner bars, use a 9×9-inch pan instead of an 8×8-inch pan.
- Smooth Slicing: Warming the knife under hot water before each cut helps to slice through the chocolate smoothly without cracking.
- Quality Chocolate: Use high-quality bittersweet chocolate for the best flavor.
Preparation Time: 15 minutes
Cook Time: 5 minutes
Total Time: 2 hours 20 minutes (includes chilling time)
Nutrition Information: (per serving, approximate)
Calories: 250 kcal
Protein: 5g
Sodium: 150mg
Conclusion
These No-Bake Crispy Corn Flake Chocolate Peanut Butter Bars are a guaranteed hit. Their ease of preparation and irresistible flavor make them a go-to recipe for any occasion. Whether you’re looking for a simple dessert to whip up on a whim or a fun activity to do with kids, these bars are sure to impress. Enjoy the perfect blend of crunch, creaminess, and sweetness in every bite!
Questions and Answers
Q1: Can I use a different type of chocolate?
A: Absolutely! While this recipe calls for bittersweet chocolate, you can substitute it with milk chocolate, semi-sweet chocolate, or even white chocolate, depending on your preference. Each type of chocolate will give the bars a slightly different flavor profile.
Q2: What can I use instead of corn syrup?
A: If you prefer not to use corn syrup, you can substitute it with honey or maple syrup. Keep in mind that this will alter the flavor slightly, giving the bars a honeyed or maple taste.
Q3: Can I add other ingredients to the bars?
A: Definitely! These bars are very customizable. Consider adding chopped pretzels for a salty crunch, dried cranberries for a chewy texture, or mini marshmallows for extra sweetness.
Q4: How long do these bars last?
A: When stored in an airtight container in the refrigerator, these bars can last for up to a week. The cool temperature helps to maintain their texture and prevent them from becoming too soft.
Q5: Can I freeze these bars?
A: Yes, you can freeze these bars for longer storage. Wrap them individually in plastic wrap and place them in a freezer-safe bag or container. They can be frozen for up to 2-3 months. Allow them to thaw in the refrigerator before serving.