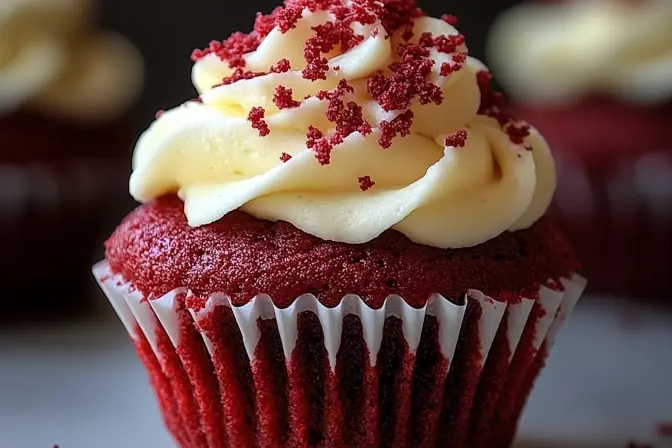
Description
Imagine sinking your teeth into a moist, tender red velvet cupcake, only to discover a creamy, decadent cheesecake surprise hiding inside. These Red Velvet Cheesecake Cupcakes are the perfect marriage of two classic desserts, combining the tangy-sweet flavor of red velvet with the rich, smooth texture of cheesecake. Topped with a luscious cream cheese frosting, these cupcakes are a guaranteed crowd-pleaser, perfect for parties, holidays, or simply indulging in a sweet treat. They’re a beautiful and delicious way to elevate your baking game! This recipe delivers a moist, velvety crumb, a tangy cheesecake center, and a sweet, creamy frosting.
Why you will love this recipe
You will fall head-over-heels for these Red Velvet Cheesecake Cupcakes for several reasons:
- The Flavor Fusion: The combination of red velvet and cheesecake is simply divine. The slightly tangy and chocolatey notes of the red velvet complement the rich, creamy cheesecake filling perfectly.
- The Texture Contrast: The moist, fluffy red velvet cupcake provides a delightful contrast to the dense, smooth cheesecake center. This textural interplay makes each bite an exciting experience.
- They’re Impressive: These cupcakes look and taste like something you’d buy from a fancy bakery. They’re visually stunning and will impress your friends and family.
- They’re Customizable: You can easily adapt this recipe to your liking. Want more cheesecake filling? Go for it! Prefer a different frosting? No problem!
- They’re the Perfect Treat: Whether it’s a special occasion or just a craving, these cupcakes are the ideal sweet indulgence. They’re decadent without being overly heavy, making them a satisfying treat any time of day.
- Easy to Make: While they look impressive, these cupcakes are surprisingly easy to make. The recipe is straightforward and doesn’t require any complicated techniques.
- Make Ahead Friendly: These cupcakes can be made ahead of time, making them perfect for parties and events. The flavors even meld together and improve over time!
Ingredients:
- For the Red Velvet Cupcakes:
- 1 1/4 cups all-purpose flour
- 1 tbsp cocoa powder
- 1/2 tsp baking soda
- 1/4 tsp salt
- 1/2 cup vegetable oil
- 3/4 cup granulated sugar
- 1 large egg
- 1/2 cup buttermilk (or ½ cup milk + 1 tsp vinegar, let sit for 5 minutes)
- 1 tsp vanilla extract
- 1 tsp white vinegar
- 1 tbsp red food coloring (gel food coloring recommended)
- For the Cheesecake Filling:
- 8 oz cream cheese, softened
- 1/4 cup granulated sugar
- 1 egg yolk
- 1/2 tsp vanilla extract
- For the Cream Cheese Frosting:
- 8 oz cream cheese, softened
- 4 tbsp unsalted butter, softened
- 1 cup powdered sugar
- 1 tsp vanilla extract
Preparation:
Step 1: Preheat & Prepare
Preheat your oven to 350°F (175°C). This ensures the cupcakes bake evenly. Place cupcake liners into a 12-cup muffin tin. Using cupcake liners is essential for easy removal and clean presentation. If you don’t have liners, grease the muffin tin thoroughly. Ensure oven rack is in the center.
Step 2: Make the Cheesecake Filling
In a small bowl, combine the softened cream cheese, granulated sugar, egg yolk, and vanilla extract. Use a hand mixer or a whisk to beat these ingredients together until the mixture is smooth and creamy, free from lumps. Set aside the cheesecake filling. If the filling sits for too long and becomes thin, a brief stir will restore its consistency. Make sure all ingredients are at room temperature to facilitate smooth mixing.
Step 3: Prepare the Red Velvet Cupcake Batter
In a medium-sized bowl, whisk together the all-purpose flour, cocoa powder, baking soda, and salt. This ensures that all the dry ingredients are evenly distributed, which is crucial for the cupcake’s texture and rise. In a separate, large bowl, whisk together the vegetable oil, granulated sugar, large egg, buttermilk (or milk and vinegar mixture), vanilla extract, white vinegar, and red food coloring. Whisk until well combined. The buttermilk adds a tangy flavor and tenderizes the cupcake. The vinegar helps activate the baking soda, contributing to the cupcake’s rise. The red food coloring gives the cupcake its signature vibrant red hue; gel food coloring is recommended for a more intense color.
Gradually add the dry ingredients to the wet mixture, mixing until just combined. Be careful not to overmix the batter, as this can result in tough cupcakes. Overmixing develops the gluten in the flour, leading to a dense texture. A few streaks of flour are okay; they will disappear during baking.
Step 4: Assemble the Cupcakes
Fill each cupcake liner halfway with the red velvet batter. A cookie scoop can help ensure consistent filling. Then, drop 1 teaspoon of the cheesecake filling into the center of each cupcake. Use a smaller spoon or a piping bag for precise placement. Top with a little more red velvet batter, filling each cupcake liner about ¾ full. This ensures the cupcakes don’t overflow during baking.
Step 5: Bake the Cupcakes
Place the muffin tin in the preheated oven and bake for 18-20 minutes, or until a toothpick inserted into the red velvet portion comes out clean. Baking time may vary depending on your oven. Start checking for doneness around 18 minutes. Let the cupcakes cool completely in the muffin tin before frosting. Cooling them completely prevents the frosting from melting.
Step 6: Make the Cream Cheese Frosting
In a large bowl, beat the softened cream cheese and softened butter together until the mixture is smooth and creamy. Ensure both the cream cheese and butter are at room temperature for easy blending. Add the powdered sugar and vanilla extract, and continue to beat until the frosting is light and creamy. Be careful not to overbeat, as this can cause the frosting to become too soft.
Step 7: Serve & Enjoy
Once the cupcakes are completely cooled, pipe or spread the cream cheese frosting onto each cupcake. Use a piping bag with a decorative tip for an elegant presentation, or simply spread the frosting with a knife or spatula. Garnish with red velvet crumbs (simply crumble leftover red velvet cake or cupcake), sprinkles, or a dusting of cocoa powder. Enjoy these moist, creamy, and delicious Red Velvet Cheesecake Cupcakes!
COOKING Rating:
Intermediate. While the steps are straightforward, achieving the right texture and flavor requires some attention to detail, such as not overmixing the batter and ensuring the ingredients are at the correct temperature.
Serving Suggestions:
- Serve these cupcakes chilled or at room temperature.
- Pair them with a glass of cold milk, coffee, or tea.
- They make a delightful addition to any dessert table or party spread.
- Consider serving them with a scoop of vanilla ice cream for an extra-indulgent treat.
- They’re perfect for birthdays, holidays, or any special occasion.
Tips:
- Use gel food coloring for a more vibrant red color in the cupcakes.
- Don’t overmix the cupcake batter, as this can result in tough cupcakes.
- Make sure the cream cheese and butter are softened before making the frosting for a smooth and creamy texture.
- Cool the cupcakes completely before frosting to prevent the frosting from melting.
- Store leftover cupcakes in an airtight container in the refrigerator for up to 3 days.
- For extra flavor, add a pinch of salt to the cream cheese frosting.
- If you don’t have buttermilk, you can make your own by adding 1 teaspoon of white vinegar or lemon juice to ½ cup of milk and letting it sit for 5 minutes.
- Experiment with different toppings, such as chopped nuts, chocolate shavings, or fresh berries.
Prep Time: 30 minutes
Cook Time: 18-20 minutes
Total Time: 1 hour (includes cooling time)
Nutritional Information: (per cupcake, approximate)
- Calories: 350-400 (This will vary depending on specific ingredients and serving sizes)
- Protein: 3-4g
- Sodium: 200-250mg
Conclusion
These Red Velvet Cheesecake Cupcakes are more than just a dessert; they’re an experience. The perfect blend of flavors and textures, combined with their stunning appearance, makes them a show-stopping treat that will impress everyone who tries them. Whether you’re a seasoned baker or just starting out, this recipe is sure to become a favorite. So, gather your ingredients, preheat your oven, and get ready to create a batch of these irresistible cupcakes. Happy baking!
5 Questions and Answers about this Recipe
Q1: Can I use a different type of flour for the red velvet cupcakes?
A: While all-purpose flour is the recommended flour for this recipe to achieve the ideal balance of tenderness and structure, you could experiment with cake flour for an even more delicate crumb. However, keep in mind that cake flour has a lower protein content, which might result in a slightly less sturdy cupcake. Avoid using bread flour, as its high gluten content will make the cupcakes tough. If using cake flour, start by substituting half of the all-purpose flour with cake flour and adjust from there based on your desired texture. You might also need to slightly reduce the liquid in the recipe, as cake flour absorbs less moisture than all-purpose flour.
Q2: What can I do if I don’t have red food coloring?
A: The red food coloring is what gives red velvet cupcakes their signature vibrant color, but if you don’t have any on hand, you can still make delicious cupcakes. You could try using beet juice or powder for a natural red color, although the result might be a more subtle hue. Alternatively, you can omit the red food coloring altogether and make “brown velvet” cupcakes. They will still have the same delicious chocolatey-tangy flavor, just without the characteristic red color. If you are looking to purchase quality Red food coloring, gel food coloring is recommended for a more intense color.
Q3: Can I make these cupcakes gluten-free?
A: Yes, you can adapt this recipe to be gluten-free. Substitute the all-purpose flour with a high-quality gluten-free all-purpose flour blend. Look for a blend that contains xanthan gum, as this will help to mimic the binding properties of gluten. You might need to adjust the liquid in the recipe, as gluten-free flours can absorb moisture differently. It’s also a good idea to let the batter rest for about 15-20 minutes before baking to allow the gluten-free flour to fully hydrate. Keep a close eye on the cupcakes during baking, as gluten-free baked goods tend to brown more quickly.
Q4: How can I prevent the cupcakes from sinking in the middle?
A: Sinking cupcakes can be caused by a few factors. One common cause is overmixing the batter, which develops too much gluten and can lead to a dense, sunken center. Make sure to mix the batter until just combined. Another cause could be opening the oven door too frequently during baking, which can cause the temperature to fluctuate and the cupcakes to collapse. Ensure your oven is properly preheated and avoid opening the door unnecessarily. Finally, underbaking can also cause sinking. Test the cupcakes for doneness by inserting a toothpick into the center; it should come out clean or with a few moist crumbs attached. If the toothpick comes out wet, bake for a few more minutes.
Q5: Can I freeze these cupcakes?
A: Yes, you can freeze these cupcakes, but it’s best to freeze them unfrosted. Wrap each cupcake individually in plastic wrap, then place them in an airtight container or freezer bag. Frozen cupcakes can be stored for up to 2-3 months. When ready to eat, thaw the cupcakes at room temperature for several hours or overnight. Once thawed, frost them with the cream cheese frosting. Frosted cupcakes can also be frozen, but the frosting may not hold its texture as well, and condensation can form upon thawing. To freeze frosted cupcakes, place them in the freezer for about an hour to firm up the frosting, then wrap each cupcake individually in plastic wrap and store them in an airtight container.