Description
This 3-Minute Microwave Fudge recipe is the ultimate treat for chocolate lovers craving a quick and easy dessert. With just a handful of ingredients and minimal effort, you can create a rich, decadent fudge that’s perfect for satisfying your sweet tooth or impressing guests. This recipe is ideal for busy individuals, last-minute cravings, or anyone who wants a foolproof dessert without the fuss of traditional candy-making.
Ingredients:
- 1 cup chocolate chips (milk, dark, or semi-sweet)
- 1 can (14 oz) sweetened condensed milk
- 1/4 cup (2 ounces) unsalted butter
- 1 tsp vanilla extract
- Pinch of salt
- Optional toppings: chopped nuts (walnuts, pecans, almonds), sprinkles, mini marshmallows, sea salt flakes
Preparation:
Step 1:
Prepare Your Dish: Line an 8×8 inch square baking dish with parchment paper. This prevents the fudge from sticking and makes it easy to lift out later. Ensure the parchment paper slightly overhangs the sides for easy removal.
Step 2:
Combine Ingredients: In a large, microwave-safe bowl, combine the chocolate chips, sweetened condensed milk, and butter. Make sure the bowl is large enough to prevent splattering during microwaving.
Step 3:
Melt in Microwave: Microwave the mixture on high for 30 seconds. Remove from the microwave and stir well. If the chocolate is not fully melted, continue microwaving in 15-second intervals, stirring after each interval, until the mixture is smooth and completely melted. Be careful not to overheat the chocolate, as it can burn.
Step 4:
Add Flavor Enhancers: Once the mixture is smooth and melted, stir in the vanilla extract and a pinch of salt. Mix until everything is well combined and the fudge base is consistent in color and texture.
Step 5:
Pour and Add Toppings: Pour the melted fudge mixture into the prepared baking dish. Spread evenly with a spatula to ensure a uniform thickness. If desired, sprinkle your choice of toppings (nuts, sprinkles, marshmallows, etc.) evenly over the top of the fudge. Gently press the toppings into the fudge so they adhere well.
Step 6:
Chill to Set: Place the baking dish in the refrigerator and chill for at least 1 hour, or until the fudge is firm and set. This chilling time is crucial for the fudge to achieve the right consistency.
Step 7:
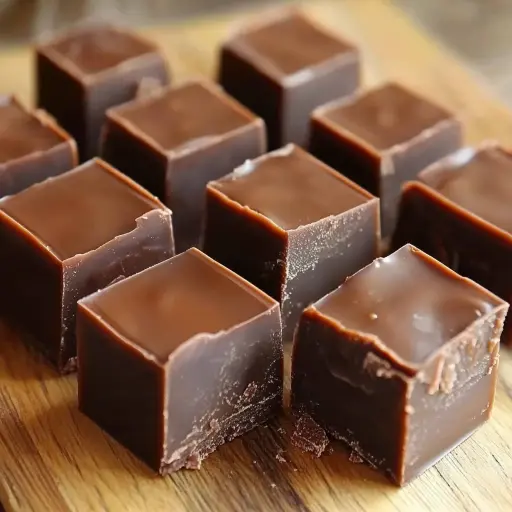
Cut and Serve: Once the fudge is firm, lift it out of the dish using the overhanging parchment paper. Place the fudge on a cutting board and use a sharp knife to cut it into squares. The size of the squares is up to your preference.
Step 8:
Store Properly: Store any leftover fudge in an airtight container in the refrigerator to maintain its texture and prevent it from melting.
Why You’ll Love This Recipe
- Quick & Easy: Ready in minutes with minimal effort.
- Simple Ingredients: Requires just a few pantry staples.
- Customizable: Easily adaptable with your favorite toppings.
- No-Bake: No oven required, perfect for hot days.
- Delicious: Rich, creamy, and satisfyingly sweet.
Serving Suggestions:
- Serve chilled, cut into small squares.
- Pair with a glass of cold milk or hot coffee.
- Include on a dessert platter with other sweets.
- Wrap individual squares as gifts for friends and family.
- Top with a dollop of whipped cream or a scoop of ice cream for an extra indulgent treat.
Tips:
- Chocolate Quality: Use high-quality chocolate chips for the best flavor.
- Microwave Safety: Microwave in short intervals to avoid burning the chocolate.
- Topping Ideas: Get creative with your toppings! Consider crushed cookies, pretzels, or dried fruit.
- Salt Balance: The pinch of salt enhances the sweetness and adds depth of flavor. Don’t skip it!
- Storage: Store in an airtight container in the refrigerator for up to 2 weeks.
Preparation Time:
- Prep Time: 5 minutes
- Cook Time: 3 minutes
- Chill Time: 1 hour
- Total Time: 1 hour 8 minutes
Nutrition Information:
(Note: Nutritional information is an estimate and can vary based on specific ingredients and serving size.)
- Calories: 180-220 per serving (depending on toppings)
- Protein: 2g
- Sodium: 50mg
Conclusion
This 3-Minute Microwave Fudge is a game-changer for anyone seeking a fast, delicious, and effortless dessert. Whether you’re a seasoned baker or a beginner in the kitchen, this recipe promises a delightful treat every time. Its simplicity and customizable nature make it a go-to recipe for any occasion. Enjoy the rich, creamy goodness of homemade fudge without spending hours in the kitchen!
Question and Answer Section
Q1: Can I use white chocolate in this recipe?
A: Yes, you can substitute white chocolate chips for the milk, dark, or semi-sweet chocolate chips. Keep in mind that white chocolate is sweeter, so you may want to reduce the amount of sweetened condensed milk slightly to balance the sweetness.
Q2: What if I don’t have parchment paper?
A: If you don’t have parchment paper, you can grease the baking dish thoroughly with butter or cooking spray. However, parchment paper makes it much easier to remove the fudge cleanly and prevents sticking, so it’s highly recommended if you have it.
Q3: Can I add nuts to the fudge?
A: Absolutely! Chopped nuts like walnuts, pecans, or almonds make a fantastic addition to this fudge. Simply sprinkle them on top of the fudge after pouring it into the baking dish and gently press them in before chilling.
Q4: How do I prevent the chocolate from burning in the microwave?
A: The key is to microwave in short intervals (30 seconds initially, then 15 seconds) and stir well after each interval. This prevents the chocolate from overheating and burning. If you notice the chocolate is starting to seize up, stop microwaving immediately and stir vigorously until smooth.
Q5: Can I freeze this fudge?
A: Yes, you can freeze this fudge. Wrap it tightly in plastic wrap, then place it in a freezer-safe container. It can be stored in the freezer for up to 2-3 months. Thaw in the refrigerator before serving.